Bit of reference footage I filmed of myself to get the main poses in first.
Okay so this is the first shot of our film that I'm working on. It's a bit jumpy in places but that's just YouTube, not my animation. I've still got things to sort out with it but its getting there.

Sunday, 28 November 2010
Friday, 26 November 2010
Animatic!
Malachi worked really fast to get this done so here is our animatic! It gives me and Nick loads to work from to complete the animation and make it much tighter for the final film.
Monday, 22 November 2010

Models!
Maik and Dave have been cracking on with models and have more completed everything for the art gallery. Here are a few examples and links to their blogs:
Maik: http://maikphamquang.tumblr.com/
Dave: http://shufflefishstudios.tumblr.com/


Maik: http://maikphamquang.tumblr.com/
Dave: http://shufflefishstudios.tumblr.com/


Thursday, 18 November 2010
Animation tests
After getting everything ready for modeling and the story done, now me and Nick can start doing some animation tests for the different scenes in the film. Here's my first test, it's a walk cycle because we'll need the character to walk around in the gallery so I thought I'd get my practice in and try to get the basics down in time for when I start to animate in the scene for real! This took me around 5 hours - not bad considering my first 3D walk cycle in first year animation last year took me the whole term.
What rig to use
We have to choose as rig to use, one that is free and we are able to work with easily. from past experience, I have some I really dont like working with, and some I find really easy and simple. As me and Nick will be doing the majority fo the character animation on our film, we chose a top 5 rigs, and then had to get it down to one.
MooM
Both V3 and V4 are nice looking rigs if you turn off the crazy front teeth, but I think we need something with more detail in the face. Also, when I last used V4, i got a lot of popping on the hips and legs when I moved them in certain ways, so I don't want to risk anything going wrong with the rig this time round!


Norman:
This rig is a Pixar rig which is used in their classes. Nick has used it quite a bit and said he likes it so this one is a possibility.

Max:
Max is very similar to Norman but i don't really like it as far as looks and detail goes.

Morpheus:
Morpheus is a newer rig. It does exactly what its names says. You can morph it into any type of character you like, male, female, small, tall, old, young. You can change every aspect of it, from eye colour to facial hair and hand size to nose. It's a nice looking rig but its quite complex as far as controls go, and we don't have all the time in the world to animate this film so I don't think its very practical if we use this rig for this.


Goon:
Recently I bought a book called 'How to cheat in maya 2010'.
 It's basically tools and tips for a maya animator and how to get your animations looking spot on. I'm finding it really useful because it explains things in depth, even if it can go quite fast at some points. With it, you get a free rig called Goon. Goon is used in the book as the rig for all the tutorials and techniques. Its really easy to use and simple. It looks nice, and has a detailed face too. It's similar to Norman and Max but I prefer Goon over these two.

After some discussion with Nick and our group, we have come to the conclusion that we will indeed be using Goon for our film. Yay!
MooM
Both V3 and V4 are nice looking rigs if you turn off the crazy front teeth, but I think we need something with more detail in the face. Also, when I last used V4, i got a lot of popping on the hips and legs when I moved them in certain ways, so I don't want to risk anything going wrong with the rig this time round!


Norman:
This rig is a Pixar rig which is used in their classes. Nick has used it quite a bit and said he likes it so this one is a possibility.

Max:
Max is very similar to Norman but i don't really like it as far as looks and detail goes.

Morpheus:
Morpheus is a newer rig. It does exactly what its names says. You can morph it into any type of character you like, male, female, small, tall, old, young. You can change every aspect of it, from eye colour to facial hair and hand size to nose. It's a nice looking rig but its quite complex as far as controls go, and we don't have all the time in the world to animate this film so I don't think its very practical if we use this rig for this.


Goon:
Recently I bought a book called 'How to cheat in maya 2010'.


After some discussion with Nick and our group, we have come to the conclusion that we will indeed be using Goon for our film. Yay!
Thinking about lighting
These are some examples I photographed of lighting. The top one is pretty much spot on to what we want out gallery to be like.


Scene Arctitecture
Today we all went to the V&A gallery in London to try and get a better idea of the layout of gallery rooms and lighting. I took a whole bunch of photos, even though I probably wasn't allowed to in some areas of the gallery!

I like the lighting in the photograph above. The colour of the walls are good too, and the spot lights on each painting are nice touch too. Have to keep this in mind for our film.


These (above) are some very 'classical' gallery setups. By this I mean then are quite old looking, like large picture frames and swirly decor. It is very dark in these rooms with deep colours on the walls. The art in these types of rooms are very old.


Glass cabinets would be a nice touch too, maybe in front of some paintings or around some vase's or sculptures.

Whereas these (above) are much more modern in how they look, like light coloured walls and less detail in the room. everything is inline and neat. The art work in these rooms are modern and mostly photographs rather than paintings.
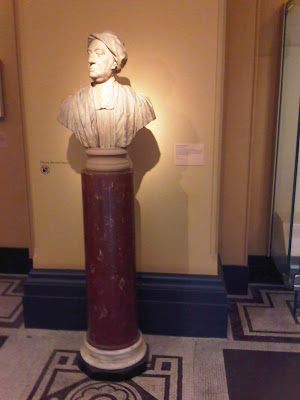
I took some photos of the more detailed areas in the rooms, such as the coving, barriers, benches, doors etc. These are all things we need to look at closely when designing and modeling them:


The white and dark colour on the walls works really well here and gives it a nice clean edge finish. We want our gallery to be nice and clean too so this is worth bearing in mind for when we come to texture.

Gold frames are a must in our painting. These fancy ones are exactly what i had in mind. Modeling references!


Bench ideas maybe? Might be a little simple as we are getting marked on the environment and level of modeling.

Nice touch would be to have a stand of writing about the paintings.


Door textures - dark wood, thats if we decide to have doors on our gallery...

This is what i was talking about earlier, having some glass in there around a vase or something. This would be such a cool little feature to our gallery!
We went into a certain room, and everything was perfect for what we had in mind for our film. We used a panorama camera to capture the whole room as one image so we could take it home and look at it in more detail. (click image to enlarge it)

Then later on in the gallery visit, we found another room where the lighting was more what we wanted in our film because it is set at night, after the gallery has shut. Here is another panoramic photograph of the second room. (click image to enlarge it)


I like the lighting in the photograph above. The colour of the walls are good too, and the spot lights on each painting are nice touch too. Have to keep this in mind for our film.


These (above) are some very 'classical' gallery setups. By this I mean then are quite old looking, like large picture frames and swirly decor. It is very dark in these rooms with deep colours on the walls. The art in these types of rooms are very old.


Glass cabinets would be a nice touch too, maybe in front of some paintings or around some vase's or sculptures.

Whereas these (above) are much more modern in how they look, like light coloured walls and less detail in the room. everything is inline and neat. The art work in these rooms are modern and mostly photographs rather than paintings.
I took some photos of the more detailed areas in the rooms, such as the coving, barriers, benches, doors etc. These are all things we need to look at closely when designing and modeling them:


The white and dark colour on the walls works really well here and gives it a nice clean edge finish. We want our gallery to be nice and clean too so this is worth bearing in mind for when we come to texture.

Gold frames are a must in our painting. These fancy ones are exactly what i had in mind. Modeling references!


Bench ideas maybe? Might be a little simple as we are getting marked on the environment and level of modeling.

Nice touch would be to have a stand of writing about the paintings.


Door textures - dark wood, thats if we decide to have doors on our gallery...

This is what i was talking about earlier, having some glass in there around a vase or something. This would be such a cool little feature to our gallery!

We went into a certain room, and everything was perfect for what we had in mind for our film. We used a panorama camera to capture the whole room as one image so we could take it home and look at it in more detail. (click image to enlarge it)

Then later on in the gallery visit, we found another room where the lighting was more what we wanted in our film because it is set at night, after the gallery has shut. Here is another panoramic photograph of the second room. (click image to enlarge it)


The story behind the painting
Now that we have our painting we can begin to decide what goes on in the weird surreal world of Dali, and then storyboard the whole film out.
Okay so as far at the painting scene goes, we have been brainstorming and have come up with some ideas which we feel would wokr really well for us and our level of maya skills.
- Shatter the Big statue as he touches is - this could wake him up out of the day dream, a bit like Inception (2010) Here is the explination of the 'kick' Click Here!
- We could have him pick up the town in the back ground to give it a more surreal feel
- Clouds creating weird shapes and lighting effects over head
- Strange noises
- 'awkward' shots in a surreal type manner. For example; warp the camera angle or distort things to look 'dreamy'
Chosen painting by the group
So we all presented our paintings we'd found by the artists we had researched and we all looked at Salvador Dali. We decided he was the artist we would go with because his paintings are very interesting and very character animation friendly as far as interacting with the environment goes. so anyways, with our futher-a-do, here is the pianting we will use in our film:


Final Paintings
These are the 3 paintingings i want to present to the group and put forward for our final one:


Subscribe to:
Posts (Atom)